
I've had a few requests for a post on braiding, so I'm going to give it a shot. I'm definitely not the world's greatest braider, but I hold my own. I learned to braid when I was 11. My riding instructor held a braiding clinic and four of us barn rats signed up. We paired off and got to work learning to braid. I wish I could say I was great at it from the start. But this photo states otherwise...
 |
| Clearly George was not happy with his 'do |
I used this adorable pony named Pumpkin Pie as my model. He has a mohawk! But as frightening as that may seem, it's not any harder to braid.

With horses I know, I usually start with the forelock. I do not necessarily suggest this on a horse you don't know. If they haven't been braided much, they may not feel comfortable with you climbing on a ladder in front of them. But if you have an old veteran, they won't mind. I nearly forgot to braid the forelock a few times which is why I like to start there.

Unless the horse is particularly unruly, I prefer to do a french braid for the forelock. I will tell you, it's really ok if your french braid isn't perfect, they usually look fine once you pull the hair up. Try to keep it straight though, even if it's not perfectly even.

You'll notice this isn't the pretties french braid. But it's ok. (I'll show you how to add yarn and tie off the braid when we move on, I should have done that here, but I didn't think to.) You will braid the hair down until you have a short tail on the end of about an inch or less like you see above. You'll then tie off the braid. At this point, you'll need a tool. I use what's called a pull through, which is like a giant sewing needle. (In a pinch, I've used actual sewing needles.)

Some braiders will use a latch hook, but this is what I learned with and what I prefer. So now you'll take your yarn that's hanging from the braid and thread it through your pull through.

Next, you'll thread the pull through up into the braid so that your yarn is now on top of your braid:

You'll then pull your yarn so that the length of the braid pulls up in the french part.

You'll keep pulling it up until the tail of the braid is completely inside the french part.

Next, you're going to feed your pull through across the top of the braid.

You're going to take just one piece of string and thread that through the pull through, and then pull it all the way out.

You'll repeat this step on the other side.

Now you'll simply tie a double knot.

And cut the extra string:

Now on to the
You'll want your mane to be just a couple of inches longer than a pulling comb. Pumpkin Pie's looks longer than that, but it's actually not. Some things to be aware of: If a mane is very thin, you'll want it on the shorter side. If a mane is extremely thick, you'll want it longer. The thicker the braid, the longer it needs to be to pull up nicely. The opposite is true for a thin mane. Pumpkin Pie has a very average type mane. Not too thick, not too thin. The farm I braid at regularly does an excellent job keeping the manes in braidable shape. (Braidable is totally a word.) Jamp's tends to be thick because I don't pull it enough in the winter. And also because he was a stallion for so long. Ok, let's get back to work!
We're going to need another tool now for the mane. You'll want a clip to hold the extra hair out of your way. This is the type I prefer:

You can find them at almost any drug store or Walmart type store in the hair care department. They usually come in a pack of 4 or 6. I like these clips with a slightly pointy tip, because they work really well to section the hair.

With this growing out bridle path that Pumpkin Pie has, our first braid will be a little tricky. If you're just learning and practicing, I wouldn't bother trying to make this work, and would just start where the mane is longer. But since I was getting him ready for a show, I needed to get that braided in. With an average mane like he has, you're going to want to take a section that's about an inch or slightly larger wide. When splitting your sections, you want to make sure that you part with a straight line. This is really important for keeping your braids from twisting. If they twist, it's really tough to keep them straight when you tie them up. And you want them straight. Believe me. (Refer to that photo of me riding George above....) Besides straight, you also want to make the braid really tight. That will take practice. Just keep at it! Loose braids won't hold their shape when you tie up. And especially not if your horse rolls in them...

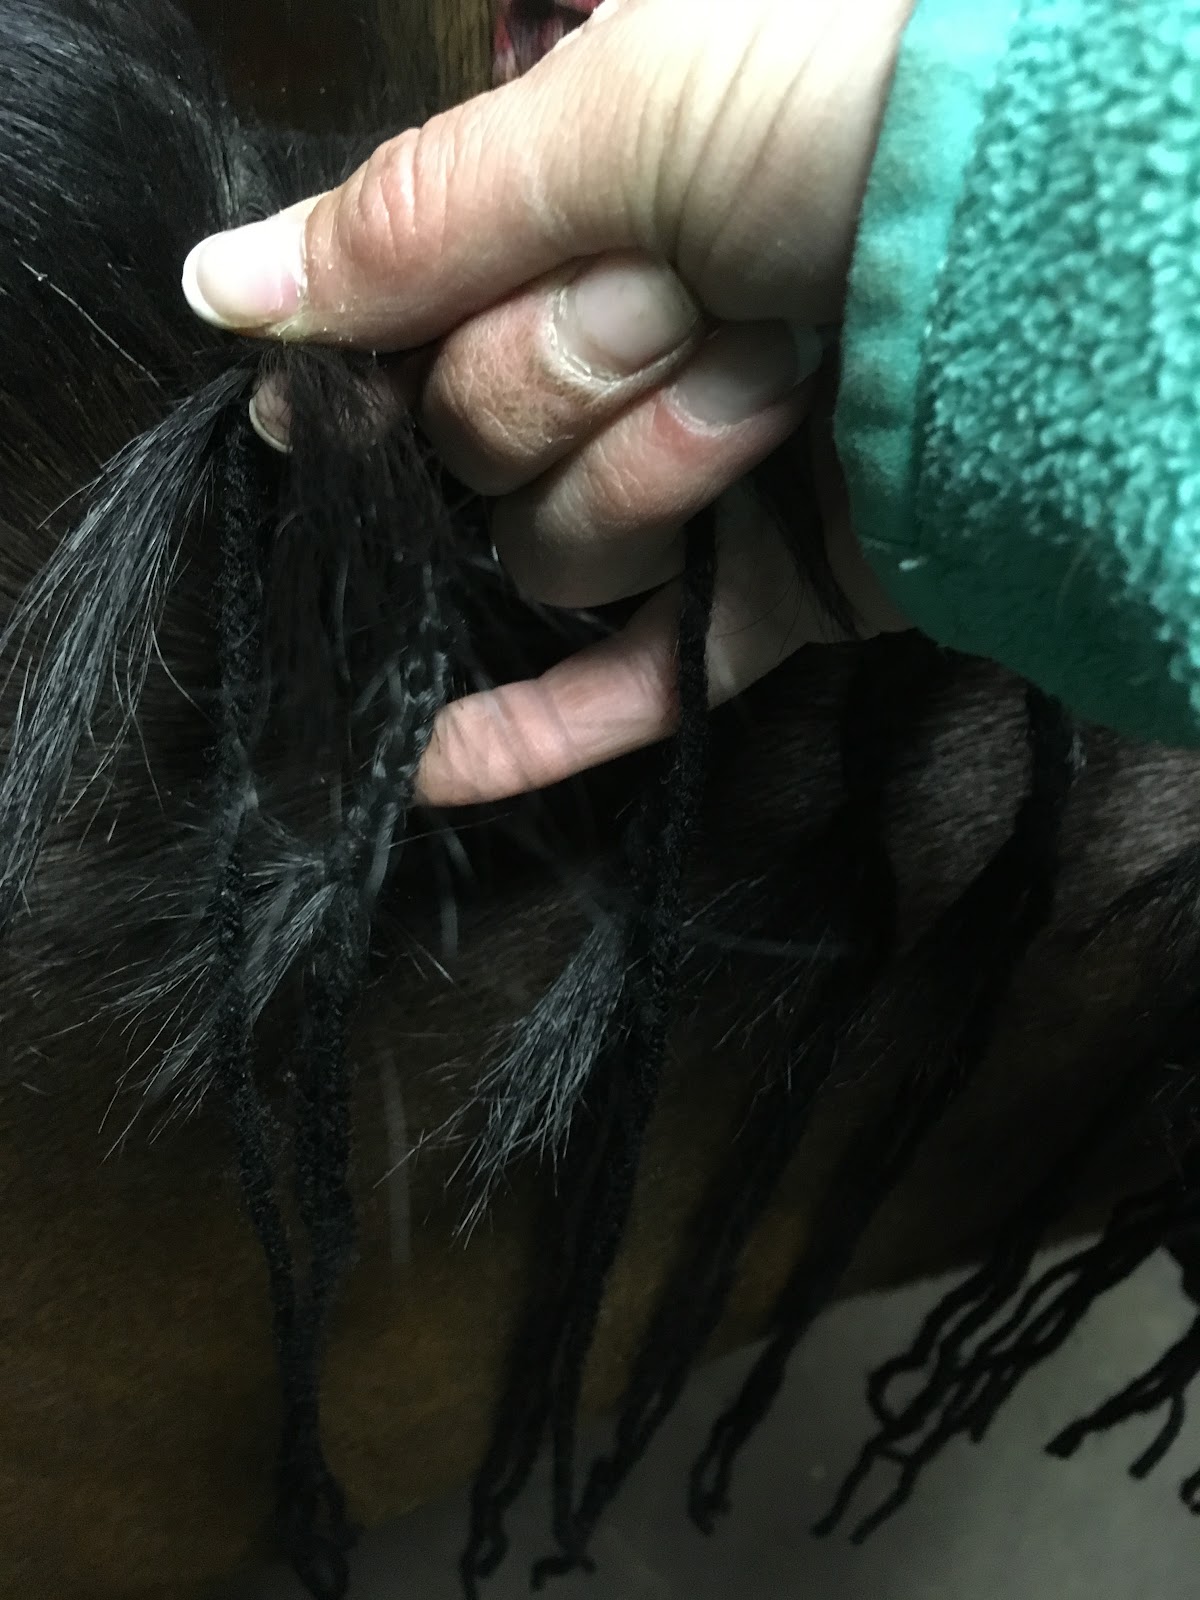
With a very thick mane, you'll want a more narrow section. Or with a very thin mane, the section may need to be closer to an inch and a half or maybe even two inches. You'll divide that inch worth of mane into three sections to start braiding. You're going to want to make sure that the three sections are pretty straight. Most importantly, you want to make sure that each section has hair from the base of the mane. By that I mean the under side. Otherwise once again, you will have twisty braids. And you don't want that! Because Pumpkin Pie has this very short section, I'm going to add yarn right from the start.


I'll do that first by just laying the string across the mane. That part that's covering the hair is the halfway mark of the string. I'll give each section one twist, and then I will fold that extra string down and include it in the braid.


Once that yarn is folded down, you won't even know it's there anymore. It simply adds length and thickness to that short section of the braid. Again, this is pretty advanced, and you don't need to try this when you're first learning. Also, if you always clip your horse's bridle path the same, you won't ever have to worry about this. So now we'll keep braiding until we're about 2/3 of the way down the hair and then we'll add yarn. For this odd little braid though, we're going to add it a little early because that pesky short section is a little awkward. I'll show how to add the yarn on another braid. This one is tricky enough, let's just finish it and move on! Once you're down near the bottom, leaving about an inch of hair, you'll hold all three sections between your left thumb and forefinger. Using your right hand, you'll separate out the yarn, wrap it around the braid and pull it through that loop you made to tie off the braid.


This braid is the worst example to teach on... You'll see that it's all fuzzy at the top and that the extra tail at the bottom is definitely more than inch. This is all because of that wonky section. So we won't harp on it. Let's move on!


I will take another inch sized chunk of hair and split it in three. This time there is no need to add yarn from the start so I'll just start braiding and go about 2/3 of the way down.

Ok, obviously this isn't braid number two... I didn't remember to show how to add yarn until a little later. It was late! Anyway, you'll go about 2/3 down and then you'll prepare to add yarn. Do this by pinching the braid in one hand so you can get your string. You'll want to add it to the two shortest sections you're working with.

This is ridiculously hard to see with a black mane and black yarn... Sorry. I'll try and explain. So left is pinching the braid as you add the yarn. I like to add it underneath, so I'll slip it under the forefinger. You should be able to keep braiding like it's not even there.

And then you'll tie off the braid like before.


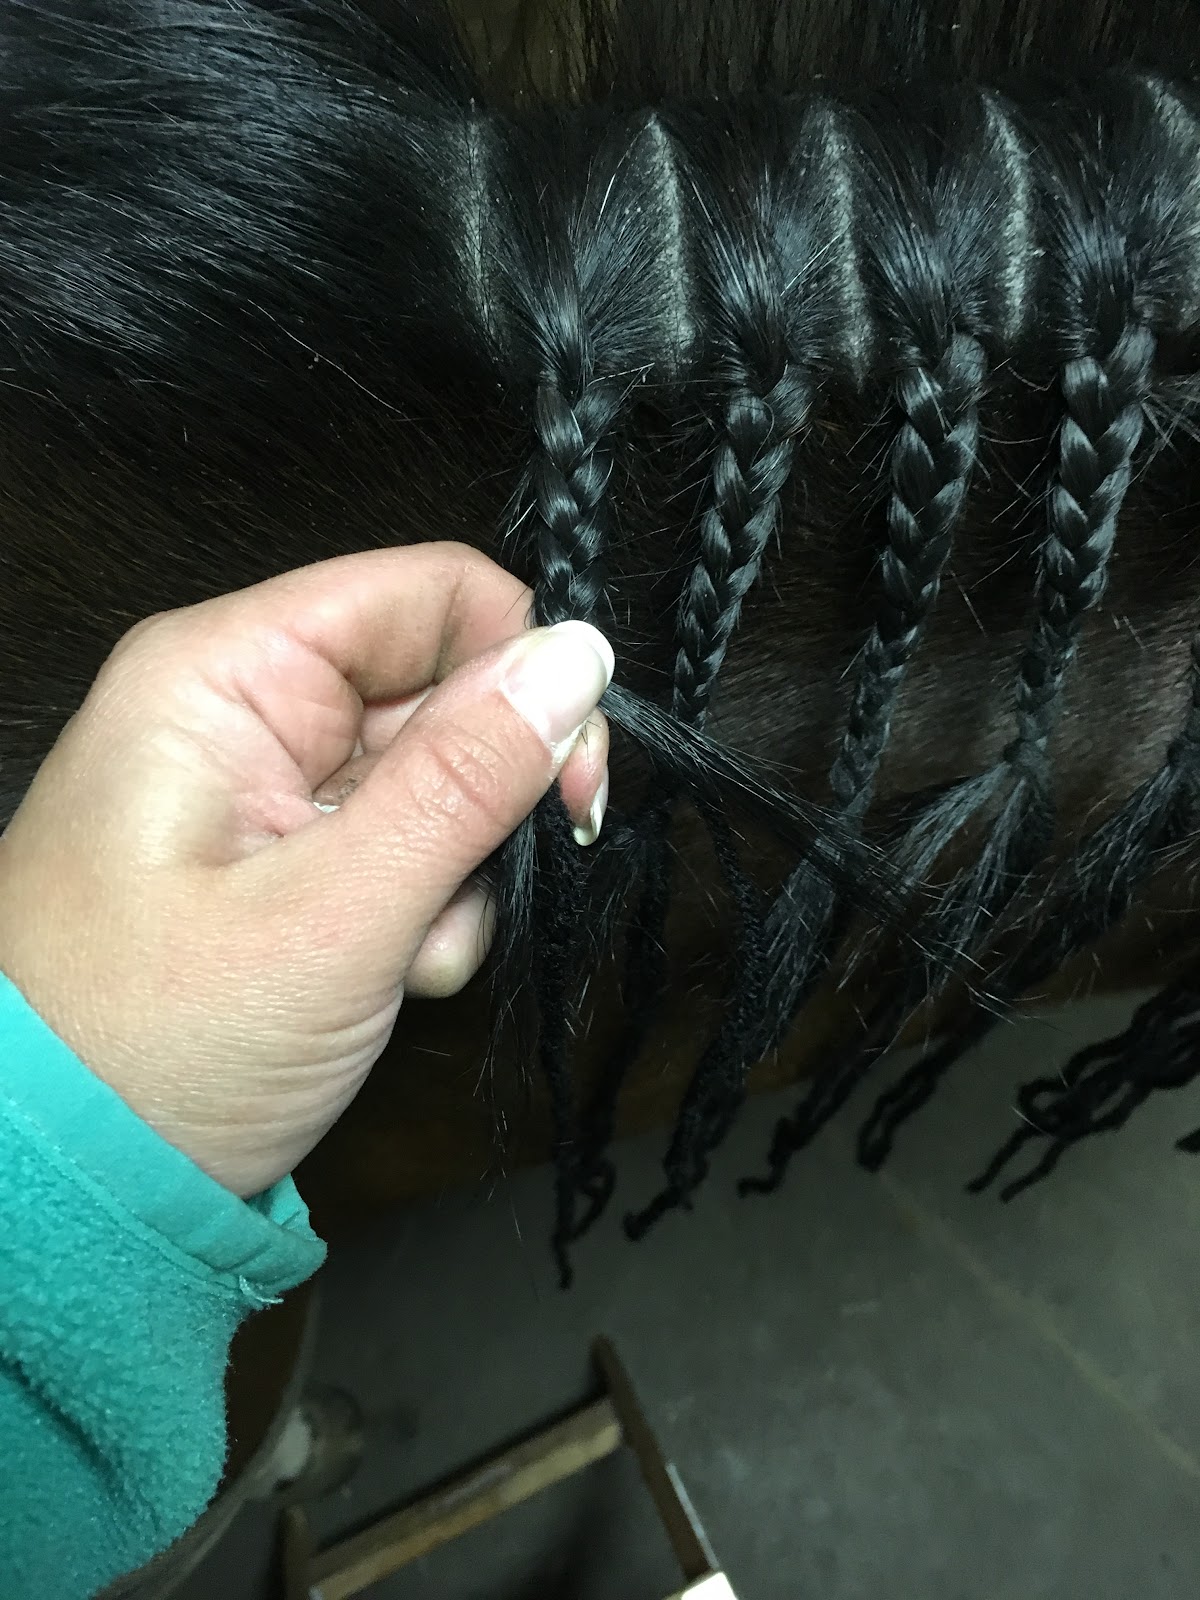
You'll repeat this allllll the way down the neck. A few things to pay attention to while braiding down: as I mentioned earlier, you'll want to straight parts for your sections, and you'll want your sections to be equal in size.


This pony has a lovely uniform mane, but most horses do not. Often when you get down toward the bottom, the mane thins out quite a bit. You may need to take larger sections to keep the braids looking similar.
Now that I've braided all of the mane down, it's time to start pulling the braids up. Time to find that pull through in my pocket...

There are a few different methods to pulling up. Some people do a complete braid at a time. I like to pull the strings through for all of the braids and then tie them off. I start at the bottom and work my way towards the head, but some people like to work the other direction. It's just preference. Makes no difference!

When pulling the yarn through, you're going to want to make sure you're in the middle of the braid. You should be able to find a midpoint that's in between hair sections. You don't really want to try and pull the yarn through the middle of a section. It will be really hard to do and you may break the string. ALSO your braid will probably twist because that won't be in the middle of the braid.


Now the fun part! Tying the braids up! The focus here is on straightness. Much like riding... Ha. Once you've pulled the strings through, You'll want to pull the knot of your braid up INTO the base of the mane. You'll actually feel the knot lock into place. This is why you want your string in between sections of hair, so there's room for the knot to pull up. You'll want to be careful that the little unbraided tail of the braid doesn't pop out and create a little mohawk. If that happens, just pull the braid down and the knot out of the mane, and try again.


Next you will split the strings apart. And tie a very loose knot.


You will bring that loop with the knot underneath the braid, and pull tight.


Now is an important step. This is when you "bump" the braid. First, you'll need to tie a surgeons knot. You'll wrap the yarn around twice to do this. So first wrap (normal knot):

Then wrap once more:

What this will do is make the knot really secure. This way you don't have to try and hold a loose knot while keeping your braid straight. This surgeons knot will just hold itself once you pull tight. You're going to want to position the knot a little below the halfway point of your braid. When you pull tight, your braid will bump up.

Once you've done this, you're nearly done with your braid! I will tie the string once under the braid, then once on top again, and then twice more underneath before cutting the strings.


If you have any unbraided tail sticking out, you can usually tie it into that underneath knot and it will disappear from view. You'll continue tying the braids up until you're done. Some things to look for while tying up: STRAIGHTNESS! You want the braids to be straight up and down. No twisting or leaning. Also, and this is pretty hard to do, and where my braids tend to fall a little short of the full time professional's, you want the bottoms of all the braids to be in a smooth line, as well as the strings in the middle. Sounds easy. But it's really not!


I hope this was helpful! I think I could have used some more and better photos, but I didn't have anyone there to take pictures for me. Some parts would be easier to show if I could have been using both hands in the picture.
Feel free to ask any question in the comments section and I'll do my best to answer them.
You braid much better than I do! I always get stuck with a straightness problem. They're tight, but they want to lean to the left.
ReplyDeleteTry this if they tend to lean left:
Deletewhen you're bumping the braid, take the string that's on the right side and pull up toward the base of the mane slightly as you tighten the knot. That should pull the braid a little the right and straighten it out for you.
Mine always end up a little too loose! These look fantastic!
ReplyDeleteThank you!
DeleteTo make them tighter, when you're braiding down, use your thumb and forefinger to hold the braid as you twist with the opposite hand. It's similar to putting your finger on a knot to keep it tight before tying a bow.
that braiding thing is sooo cool! :D
ReplyDeleteHave a great week ahead!
Animated Confessions
Thanks! It's a great way to earn extra $$
DeletePumpkin Pie looks JUST like a pony at my barn named Chase!
ReplyDeleteThanks for posting this! My goal is to learn to braid before I start taking P to rated shows so at least I can save money there :)
He's the cutest thing! I bet Chase must be also ;)
DeleteYou're welcome! Feel free to ask any questions when you're getting started.
I keep telling myself I should learn to braid to make extra cash...
ReplyDeleteIt's great money! I get $55 per mane and $30 per tail. Which generally (if the manes are in good shape) equates to about an hour and a half of work. Sometimes less.
DeleteThank you!
ReplyDeleteThanks for reading!
ReplyDeleteThis is a great tutorial. I feel like I actually know what to do now. Of course, my mule has a mohawk so we don't braid, but now I feel like I could maybe.
ReplyDeleteYou definitely could! Pumpkin Pie has a mohawk too!
DeleteWhere did you get your pull through - I used to have one just like it but can't seem to find anyplace that sells them these days!
ReplyDeleteI've always gotten them from Beval. I'm not sure if they're on the website, but you could probably call and have it sent to you if not.
ReplyDeleteYou make hiding the tail look so easy! I struggle with the pull it into the base of the braid step. In an attempt to get it up there I end up pulling it all the way through sometimes. I seriously cannot figure out to hide the tail up there! ARGH! I'm doing everything else right as far as I can tell.
ReplyDelete